With apps and games growing ever more complex, and smartphone cameras being fully able to shoot in 4K, nowadays, it’s pretty easy to fill up a phone’s internal memory. And if you happen to have one of these lower-tier iPhones that “only” comes with 64 GB, storage phobia could be a real thing for you.
You may have already faced the dreaded “iPhone storage full” message, or you may just be living in fear of it. In any case, here are a few tips to help you maintain a decent overhead in your iPhone’s memory and keep a peace of mind:
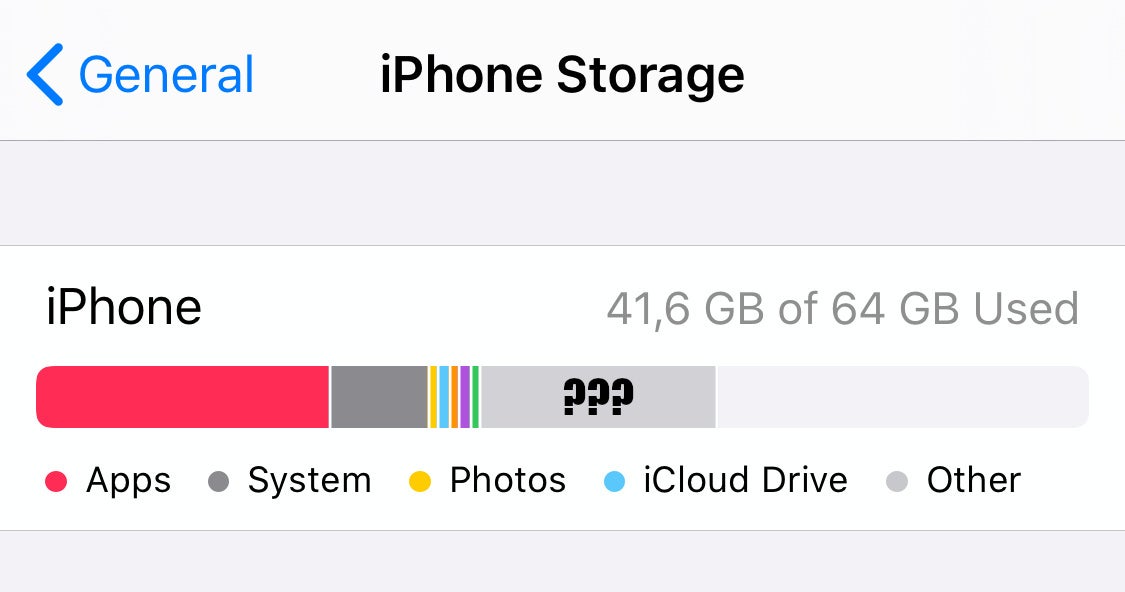
What is “other” mean in my iPhone storage? How do I delete Other storage?
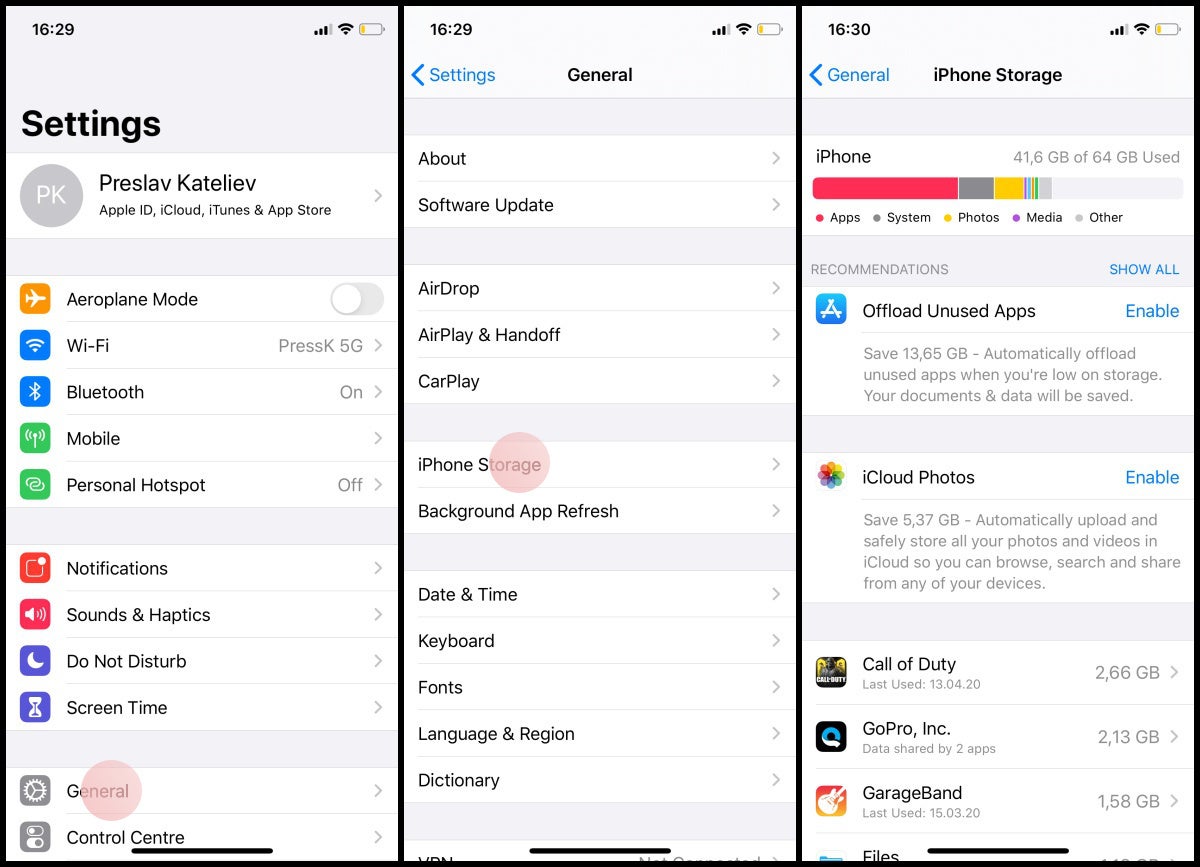
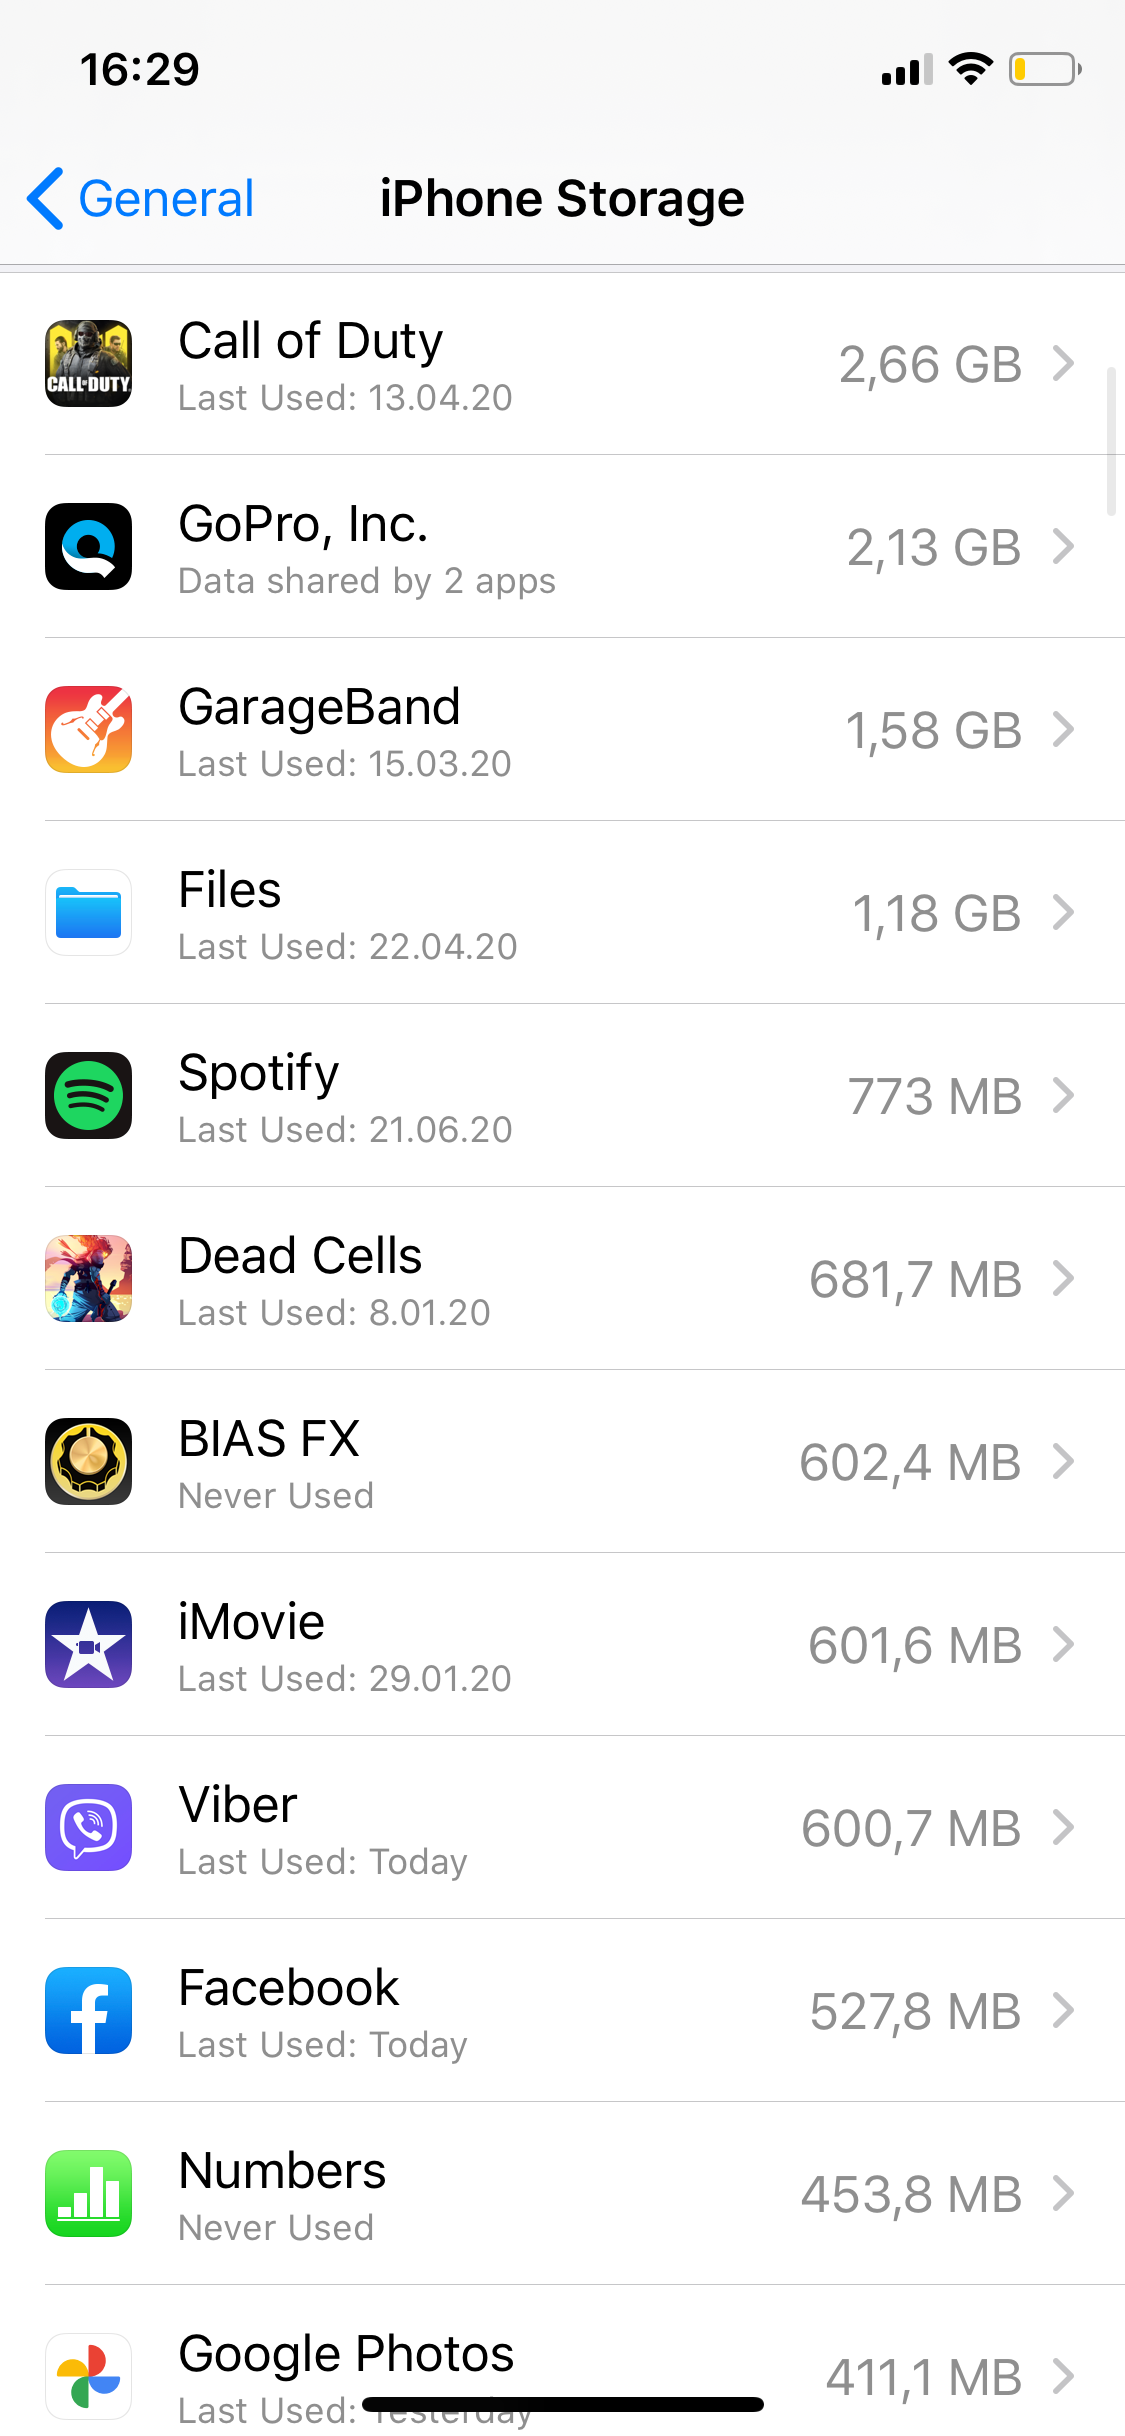
So, if you go into Settings -> General -> iPhone storage you get a quick overview of all the apps that are taking up space in your phone, assorted by size. That’s cool. Up above, you have this meter, which lets you know how much of your iPhone’s storage is taken up by photos, apps, system files, iCloud Drive files, and… “Other”? What is Other?
Basically, anything that iOS can’t fit into any of its pre-set categories falls into “Other”. I know this doesn’t help by much, so let me give you an example.
If I use an app like BeatMaker 2 to make a few music projects, and record a bunch of sound files, these files will be saved somewhere on the iPhone or iPad — in a folder that I can’t see through the Files app, but one that is exclusive to BeatMaker.
iOS will call these 3rd party project files “Other” and that little gray bar will grow.
Settings -> General -> Storage
This logic applies to a plethora of other apps. For example, if you are opening a .zip file in iZip, what’s really happening is that iOS is creating a copy of the file for the iZip app and adding it in the app’s exclusive (and invisible) folder. After you extract the files, you can export them for use with any other app you choose. However, a copy of the extracted package will still stay in that iZip app. To get rid of it, you need to get back into iZip and manually delete it.
Recommended Stories
So, in other words, it’s a bit hard to track what exactly is filling up that Other bar, and there isn’t an easy way to delete said files. You just need to be aware of the iOS file system’s peculiar workings and remember to enter specific apps to delete old stuff when you no longer need it.
Delete some games and apps, maybe?
When was the last time I played CoD Mobile?
Yes, I know that “This game looks cool” and “I’ve been meaning to get to this app, which is why I keep it”, but how many months have they stayed on your phone without ever being opened?
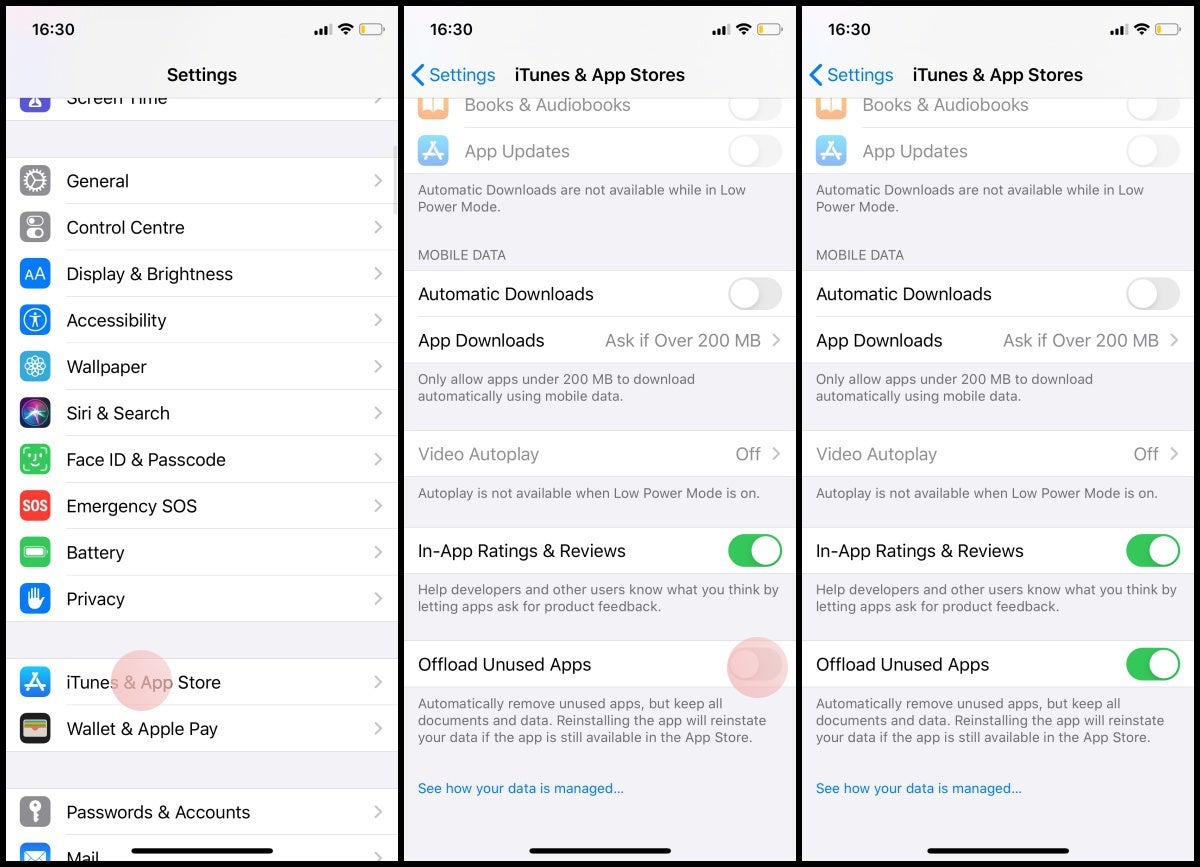
OK, let me suggest — instead of deleting them, you have the option to “Offload” these apps. What this means is that iOS will keep any documents and saves that are relevant to these apps, but will delete the actual app from the iPhone. Its icon will remain in place to remind you of its existence and you can initiate a re-download by simply tapping said icon.
Try it out, see if you actually miss Call of Duty: Mobile.
Set up automatic app offload
If you find it hard to decide, you can set up automatic app offloading. Basically, whenever iOS detects that you haven’t been using an app for quite a bit, it will offload it for you. Personally, I stay away from this option, because it can delete an app that I only very rarely need, but when I do — I want it instantly. For example — a currency converter.
Photos and video
We do love our smartphone cameras, taking memorabilia left and right, event re-taking shots multiple times just in case. That’s cool, but these high-res images and videos sure have a tendency to take up a ton of space!
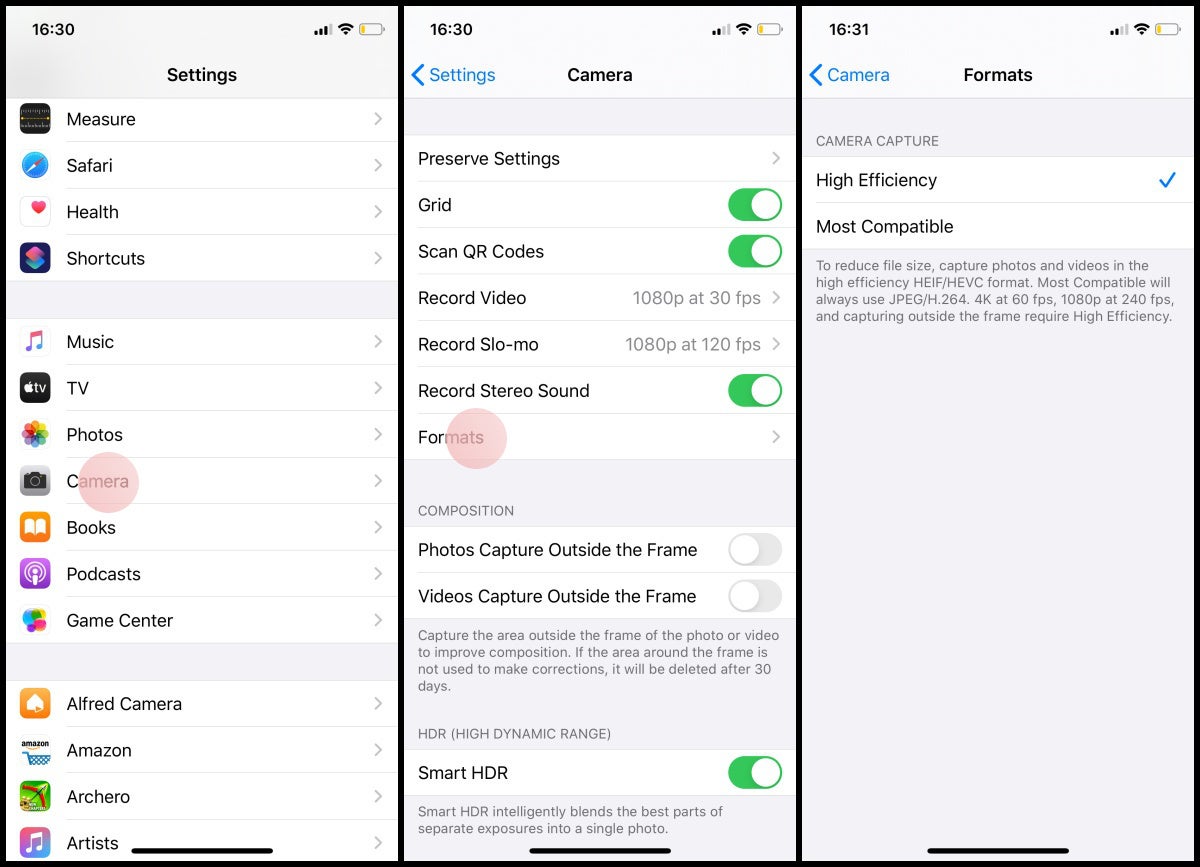
You have a couple of options to tame this storage-hungry beast. For one, you can set the iPhone to save media in a High-Efficiency format (this is on by default, but hey, check it just in case). Photos will be saved in HEIF format, which means they retain their quality, but the file sizes are a quarter of the JPG size.
Settings -> Camera -> Formats -> High Efficiency
It should be noted that this makes it a bit more cumbersome to share photos and videos. Yes, if you send them through any chat app, said app will apply the needed compression and conversion to make the media viewable on an Android phone or Windows PC. But if you upload these photos to a cloud service of any kind and try to share them this way, there’s a good chance some recipients may not be able to view them.
But the point remains that whether you choose to go with High Efficiency or the classic formats, photos and videos will eventually, and inevitably, start eating away at your iPhone’s storage.
Use iCloud to store photos
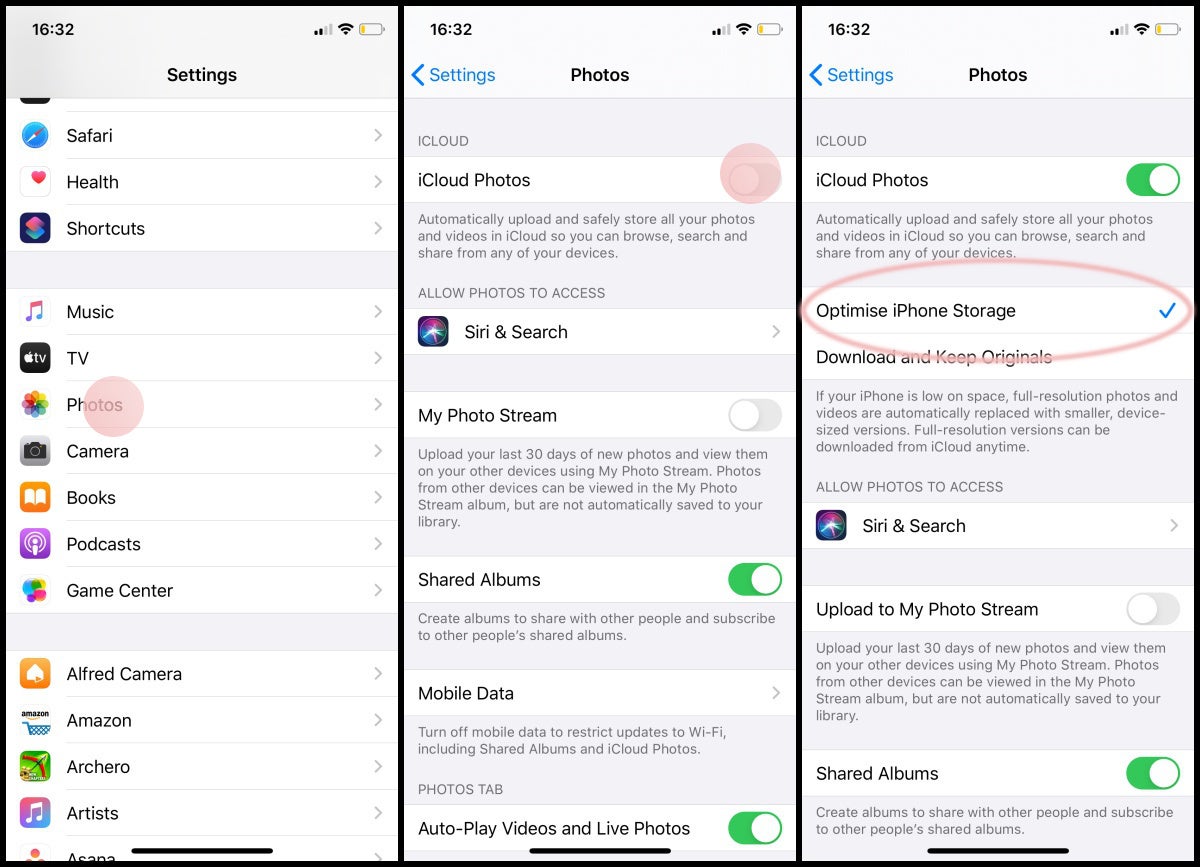
You have two best options here. One — sync your photos with iCloud and choose the option “optimize iPhone storage”. This means that older photos will be deleted from the phone (but kept in iCloud) and you will only see small thumbnails of them as you scroll through your gallery. Whenever you tap one, the iPhone will re-download the full resolution image so that you can view it.
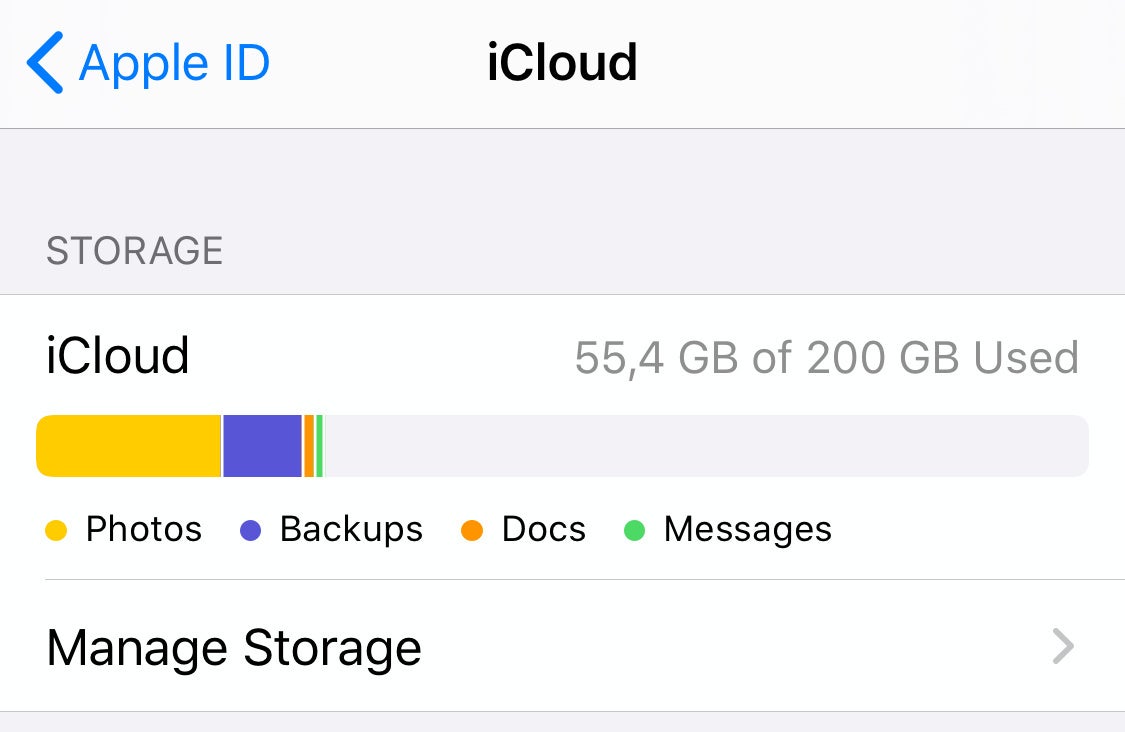
This is a method that works well as it’s at the core of the Apple ecosystem and a part of iOS’ feature set. But there’s a small caveat — you will need to pay for the iCloud storage that’s housing those photos and videos. And, eventually, you will need to filter through them, delete the unwanted ones, and download and store your “keep forever” photos, as they start to clog up your iCloud as well.
iCloud storage is cool, but still limited. And paid!
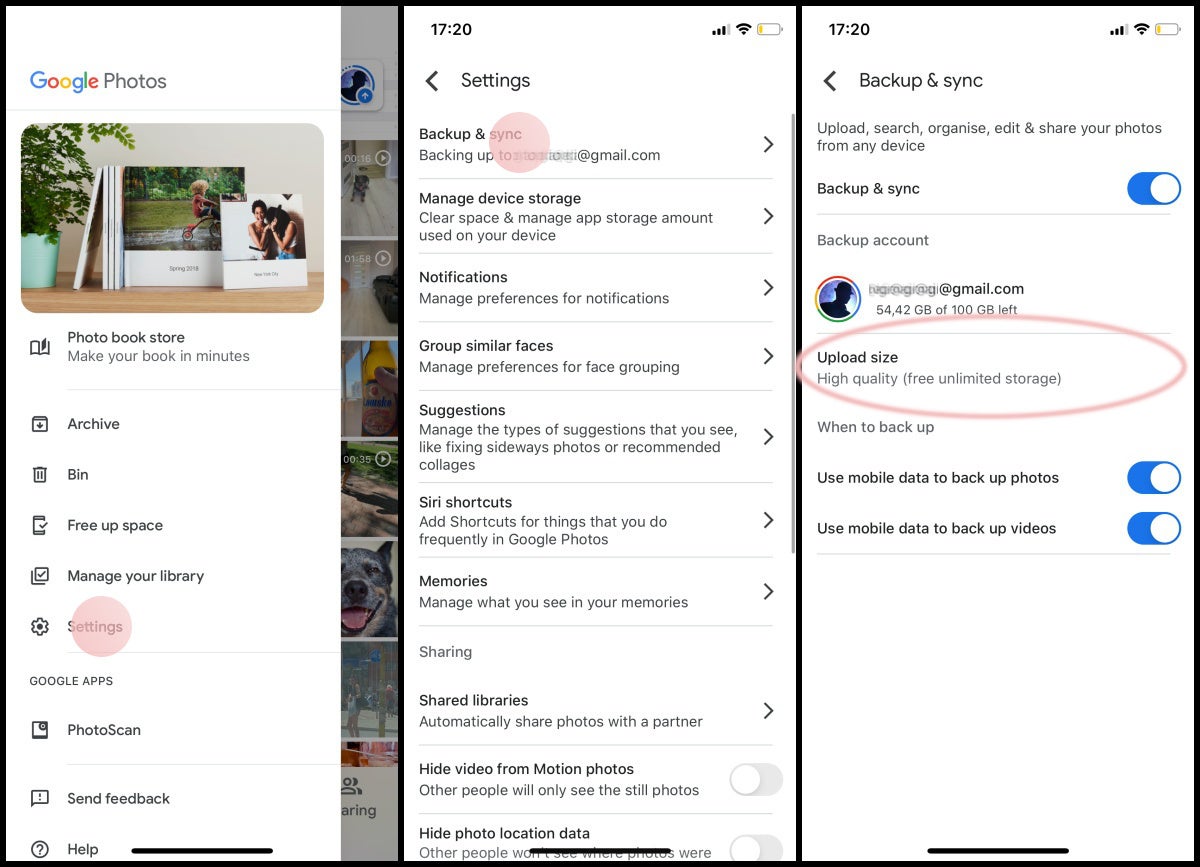
Use Google Photos to store photos
The second best option uses Google’s Photos service. You can download the app, set up your Google account, and have your iPhone automatically upload images in the “High Quality” format. This setting means that your images can only be as big as 16 MP and will be downsized to 16 MP if they exceed that limit.
But that’s fine for your iPhone photos — they will remain virtually untouched.
Give your gallery time to upload to Google Photos and feel free to clear the media from your iPhone’s gallery.
Google Photos is extremely good at sorting your photos and finding people, pets, events, and locations you took a series of shots as soon as you ask it.
Couple of caveats here — one, Google Photos is not so tightly integrated in iOS. So, for example, if you want to add one of your old pictures into an image editing app or an iMovie clip, you won’t be able to browse your Google Photos gallery natively, like you can browse through the thumbnails of your iCloud-saved photos. You will need to go into Google Photos, find the picture you need, download it to the iPhone manually, and then add it to the aforementioned app.
Secondly, people are increasingly worried about the tradeoff here — Google is basically giving you unlimited storage for your personal photos and asking for nothing in return. What exactly are we giving up when using Google Photos?
Tinfoil hats off — for one, the Photos app is monetized through offering you personalized print books, which you can order at any time. Secondly, Google is probably more than willing to provide said server space as long as this keeps users at least partly hooked to its ecosystem. It makes that “Switch to Pixel” question that much easier to consider.
Still, history has taught us that sensitive photos have no place in the cloud (any cloud) and we’d even suggest you steer away from taking such with a smartphone.
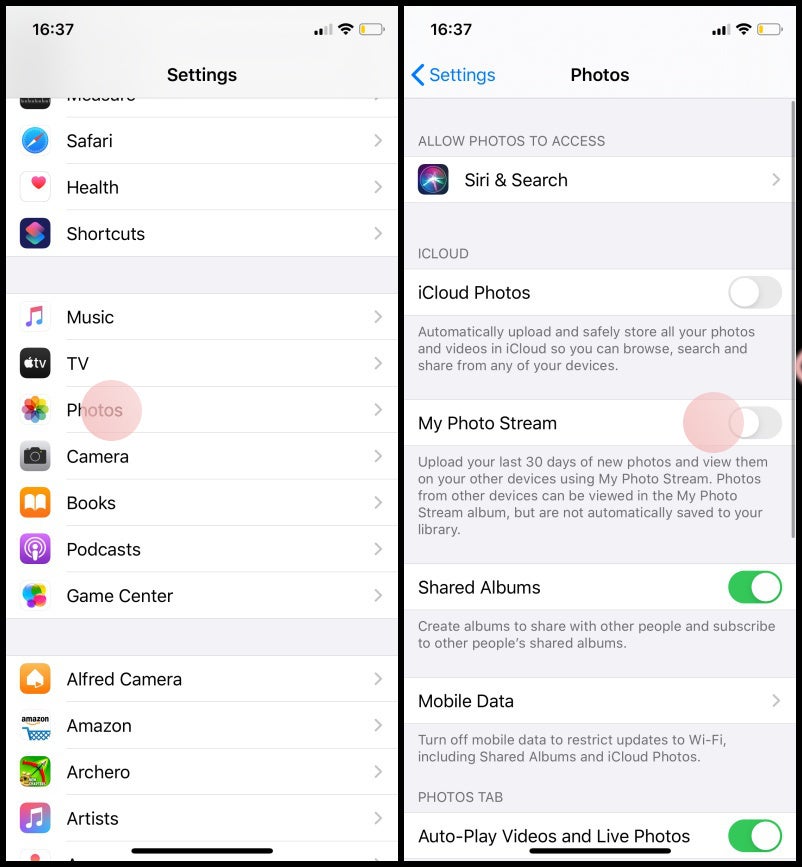
Disable / delete Photo Stream
A service that’s somewhat confusingly separate from iCloud Photos is the My Photo Stream option. It will automatically share any pictures and videos you’ve taken over the past 30 days (or up to 1,000 images) across all your iOS and Mac devices.
That’s quite useful for a small number of users. Others may never need it. The fact remains that Photo Stream is taking up extra space on your iPhone — it’s a separate folder that stores copies of your original pictures. So, either disable it, or go in there and delete the images you’re done with after using them for whatever you need them on your other devices.
Disabling Photo Stream
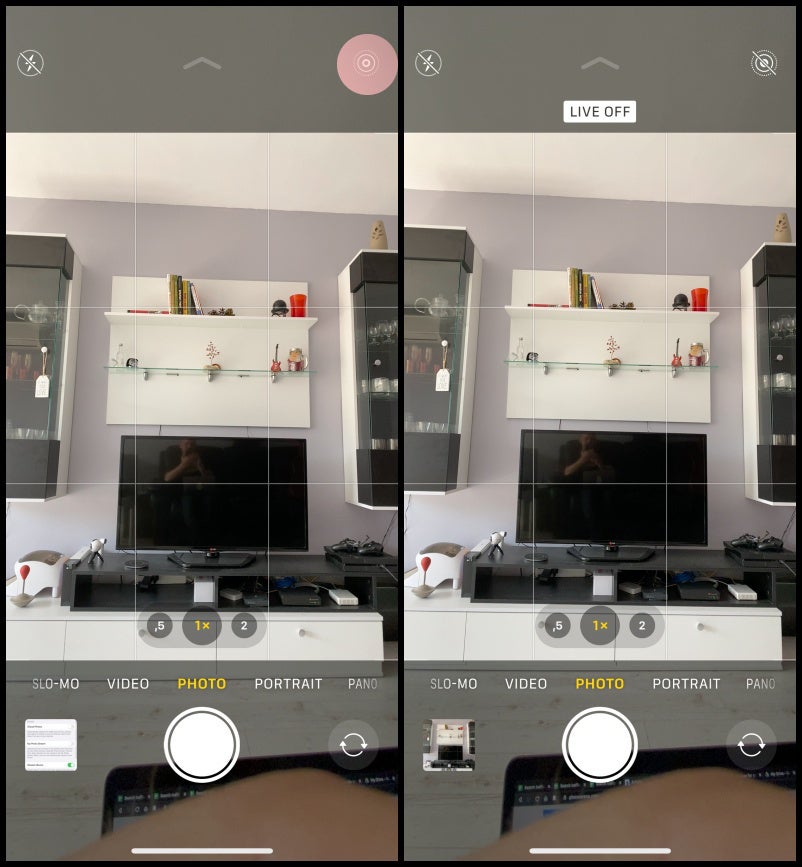
Use Live Photos with care
Live Photos are cool — they record a short clip of the motion and sound that happened tight before and right after you press the shutter button. You can use them to make creative, Boomerang-like GIFs, or to take a picture of a pet or baby, which doesn’t understand the concept of “staying still for the camera”.
But it’s a situational tool, which a lot of users forget to ever turn off. These short clips can rack up fast and take more space than you are willing to give away, so just keep it off. Whenever you need a Live Photo, it’s a thumb-tap away.
The Live Photo icon is a little circle in the Camera app
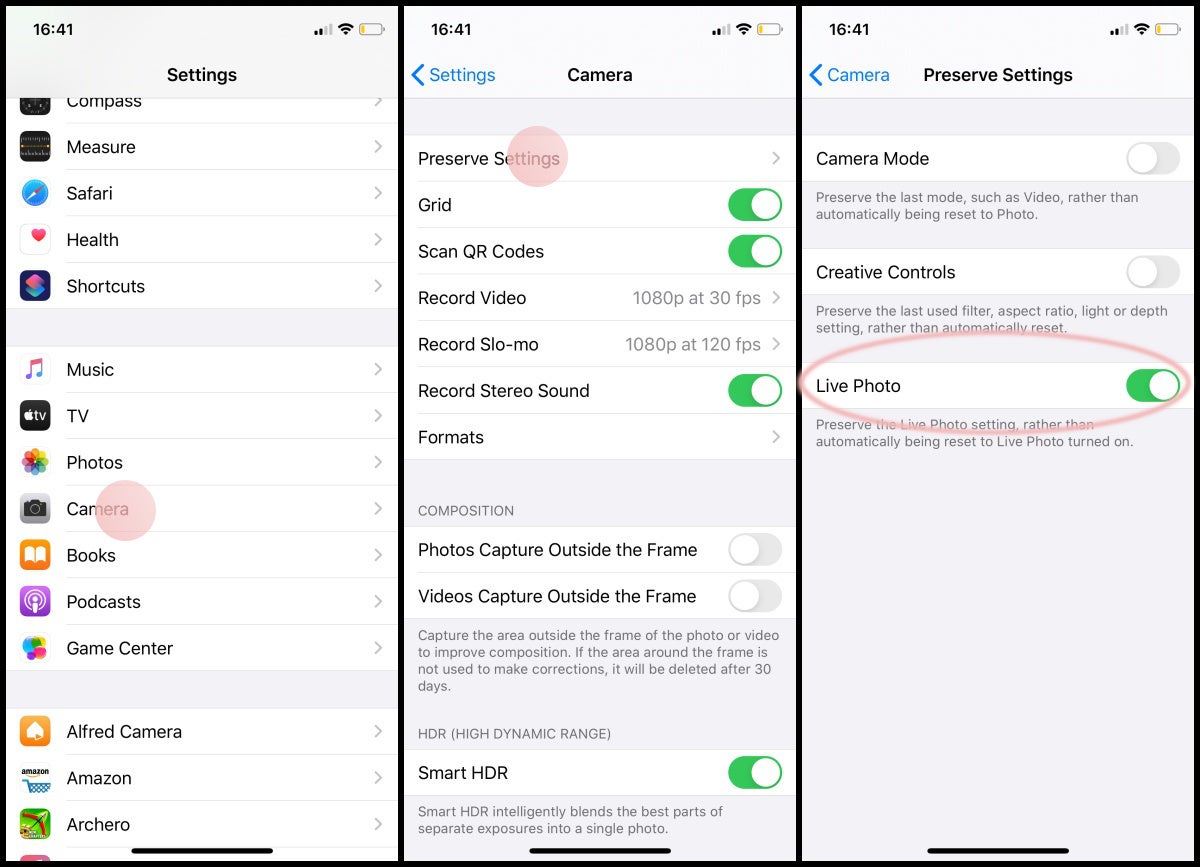
Sidenote, the Camera app will always turn Live Photos on by default. If you want the iPhone to "remember" that it's supposed to be off, go into Settings -> Camera -> Preserve settings -> turn it on for Live Photo.
Clear up your music
We live in the era of streaming music, but this doesn’t mean your iPhone isn’t storing songs offline. Music apps usually have dedicated cache storage to make song transitions faster and to make sure playback is not interrupted if your connection drops for a few seconds or so.
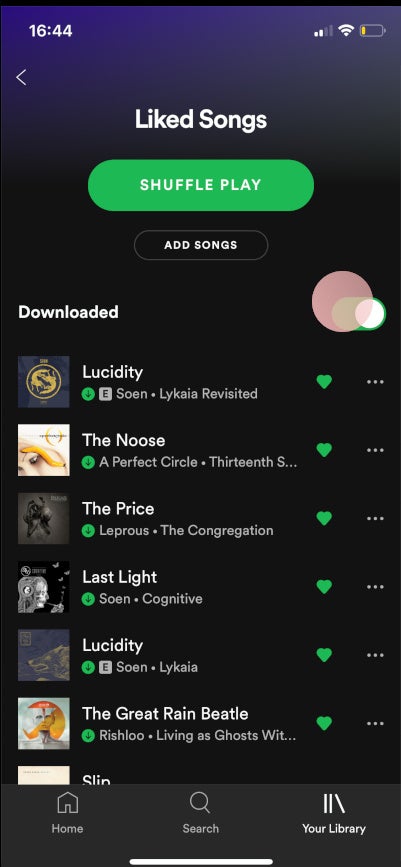
The easiest thing to miss — if you have Spotify Premium, every time you “like” a song, it will join your “Liked Songs” playlist. Yes, yes, that’s obvious, I know. But the “Liked Songs” playlist has download enabled by default. So, technically, it’s an ever-growing selection of songs you can listen to offline.
That’s not a bad thing, but many users are unaware that simply tapping that heart tells Spotify “Add that to my storage bill, please!”.
If you wish to disable downloads for your Liked playlist, just open it up (Your Library -> Liked Songs) and flick that Download ticker to off. Just remember to manually download some music if you’re going out camping.
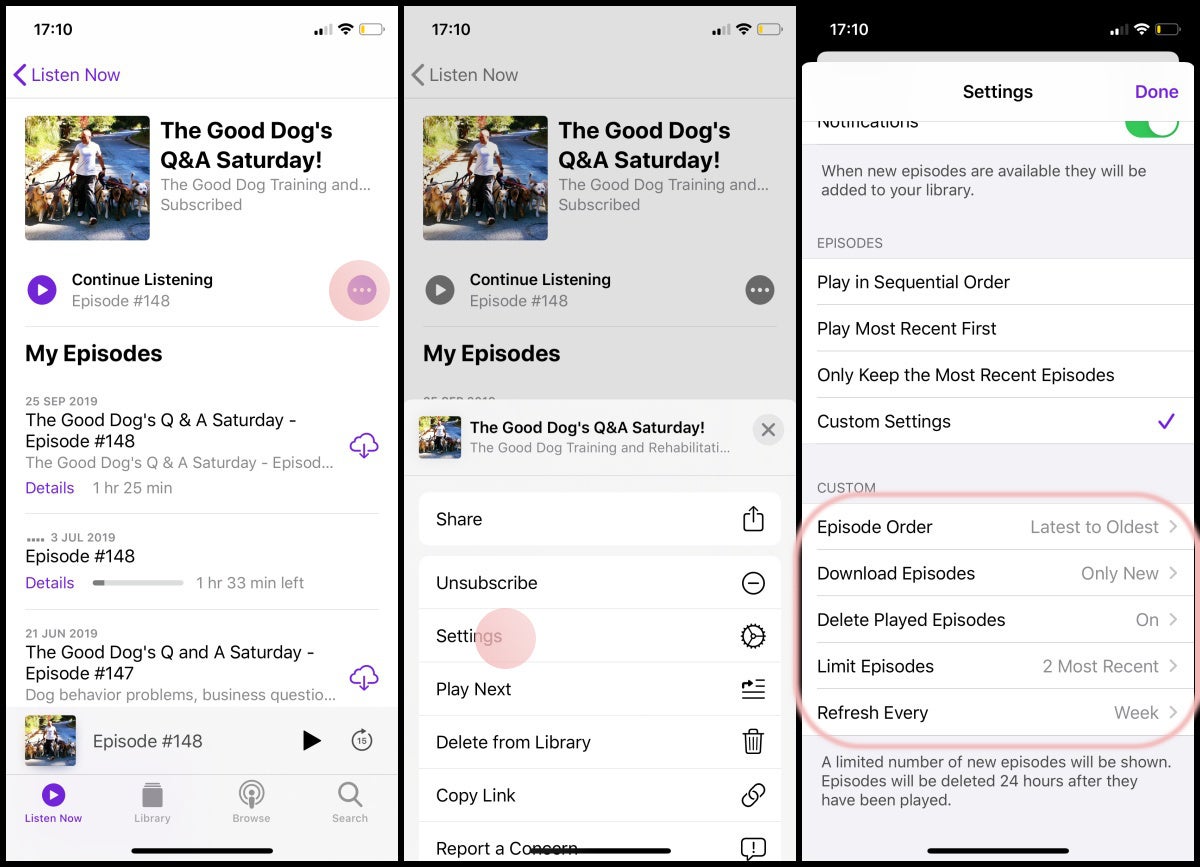
Delete old podcasts, set up Podcasts app
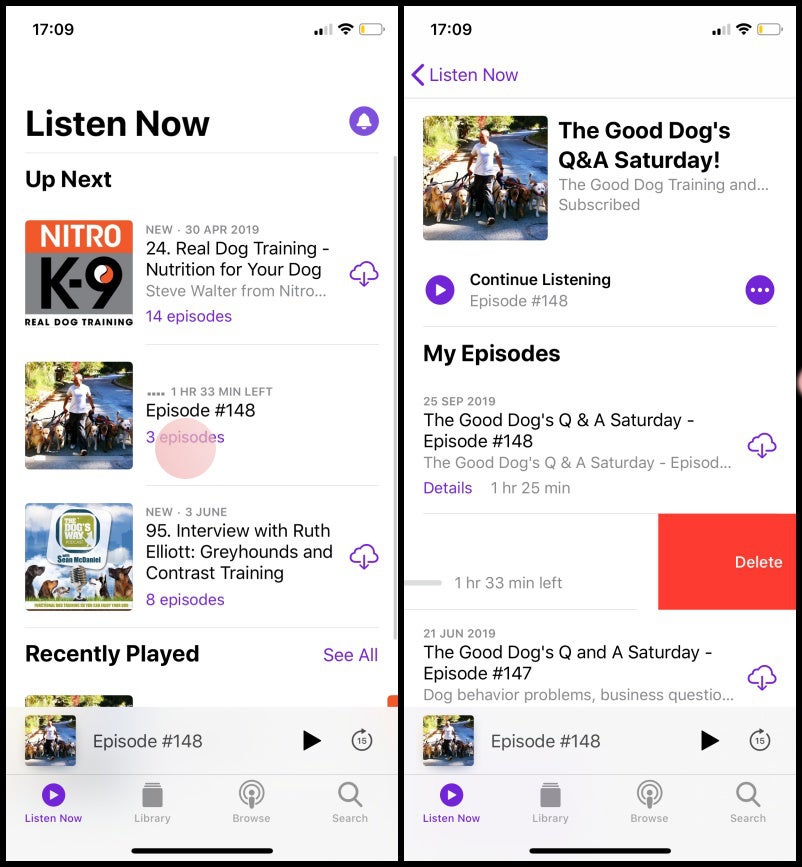
The Podcasts app will automatically download new episodes of shows that you are subscribed to. That’s cool and convenient, but its default settings don’t necessarily tell it to delete old episodes that you are done with.
So, you can scroll through your podcasts and identify episodes that are still on the iPhone (those will not have a cloud icon to their right). Choose to delete old ones that you’ve been through already.
To automate this process, go into a show, tap the triple-dot menu, and go to Settings. There, you will be able to tell the app to only keep the most recent episodes. That way, you make sure that your iPhone isn’t clogged up with old episodes anymore.
Preslav, a member of the PhoneArena team since 2014, is a mobile technology enthusiast with a penchant for integrating tech into his hobbies and work. Whether it's writing articles on an iPad Pro, recording band rehearsals with multiple phones, or exploring the potential of mobile gaming through services like GeForce Now and Steam Link, Preslav's approach is hands-on and innovative. His balanced perspective allows him to appreciate both Android and iOS ecosystems, focusing on performance, camera quality, and user experience over brand loyalty.
Recommended Stories
Loading Comments...
COMMENT
All comments need to comply with our
Community Guidelines
Phonearena comments rules
A discussion is a place, where people can voice their opinion, no matter if it
is positive, neutral or negative. However, when posting, one must stay true to the topic, and not just share some
random thoughts, which are not directly related to the matter.
Things that are NOT allowed:
Off-topic talk - you must stick to the subject of discussion
Offensive, hate speech - if you want to say something, say it politely
Spam/Advertisements - these posts are deleted
Multiple accounts - one person can have only one account
Impersonations and offensive nicknames - these accounts get banned
Moderation is done by humans. We try to be as objective as possible and moderate with zero bias. If you think a
post should be moderated - please, report it.
Have a question about the rules or why you have been moderated/limited/banned? Please,
contact us.


Things that are NOT allowed: